X 您的支持就是我的动力,觉得好用就给个Star吧!
点Star赠送官方Vue2/3使用Demo一份
点Star赠送官方Vue2/3使用Demo一份
点击star后点此下载
TIANAI-CAPTCHA
可能是开源界最好用的行为验证码工具
介绍
简介
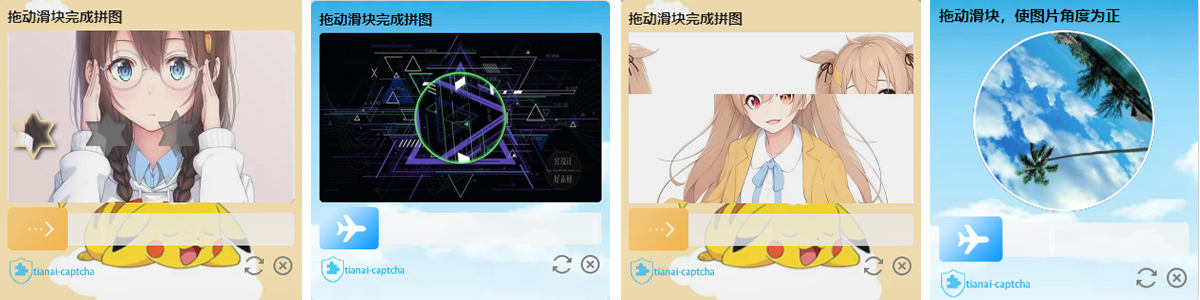
TIANAI-CAPTCHA,以下简称TAC 是一个开源的行为验证码工具,支持多种验证码类型,分别有java、go等语言的实现。
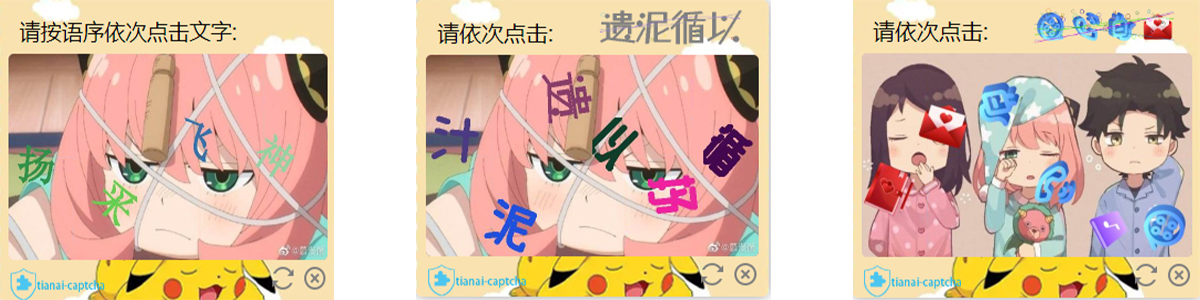
开源版默认提供了 滑块验证码、旋转验证码、文字点选验证码、滑动还原验证码等,
在线体验
文档
最新版本: v1.5.5
快速上手
JAVA后端接入
SpringBoot项目
1. 引入SpringBoot脚手架
 <!-- maven导入 -->
<dependency>
    <groupId>cloud.tianai.captcha</groupId>
    <artifactId>tianai-captcha-springboot-starter</artifactId>
    <version>1.5.5</version>
</dependency>
2.配置验证码相关配置
在springboot项目的application.yaml进行配置
# 行为验证码配置, 详细请看 cloud.tianai.captcha.autoconfiguration.ImageCaptchaProperties 类
captcha:
  # 如果项目中使用到了redis,滑块验证码会自动把验证码数据存到redis中, 这里配置redis的key的前缀,默认是captcha:slider
  prefix: captcha
  # 验证码过期时间,默认是2分钟,单位毫秒, 可以根据自身业务进行调整
  expire:
    # 默认缓存时间 2分钟
    default: 10000
    # 针对 点选验证码 过期时间设置为 2分钟, 因为点选验证码验证比较慢,把过期时间调整大一些
    WORD_IMAGE_CLICK: 20000
  # 使用加载系统自带的资源, 默认是 false(这里系统的默认资源包含 滑动验证码模板/旋转验证码模板,如果想使用系统的模板,这里设置为true)
  init-default-resource: true
  # 缓存控制, 默认为false不开启
  local-cache-enabled: false
  # 缓存开启后,验证码会提前缓存一些生成好的验证数据, 默认是20
  local-cache-size: 20
  # 缓存开启后,缓存拉取失败后等待时间 默认是 5秒钟
  local-cache-wait-time: 5000
  # 缓存开启后,缓存检查间隔 默认是2秒钟
  local-cache-period: 2000
  # 缓存开启后,忽略的字段,默认是 ""(不忽略任何字段)
  local-cache-ignored-cache-fields: ""
  # 配置字体包,供文字点选验证码使用,可以配置多个,不配置使用默认的字体
  font-path:
    - classpath:font/SimHei.ttf
  secondary:
    # 二次验证, 默认false 不开启
    enabled: false
    # 二次验证过期时间, 默认 2分钟
    expire: 120000
    # 二次验证缓存key前缀,默认是 captcha:secondary
    keyPrefix: "captcha:secondary"
3. 给行为验证码配置背景图片
- 注意:如果使用自带的模板资源, 背景图尺寸需要改成600x360
@Configuration
public class CaptchaResourceConfiguration {

    /**
     * 配置验证码资源存储器
     * @return ResourceStore
     */
    @Bean
    public ResourceStore resourceStore() {
        // 使用简单的本地内存存储器,实际项目中可以使用数据库等存储
        LocalMemoryResourceStore resourceStore = new LocalMemoryResourceStore();

        // 配置背景图
        // arg1: 验证码类型(SLIDER、ROTATE、CONCAT、WORD_IMAGE_CLICK)
        // arg2: Resource对象,包含: 资源类型(calsspath、file、url)、文件路径、tag标签

        resourceStore.addResource(CaptchaTypeConstant.SLIDER, new Resource("classpath", "bgimages/a.jpg", "default"));
        resourceStore.addResource(CaptchaTypeConstant.SLIDER, new Resource("classpath", "bgimages/b.jpg", "default"));
        resourceStore.addResource(CaptchaTypeConstant.SLIDER, new Resource("classpath", "bgimages/c.jpg", "default"));
        resourceStore.addResource(CaptchaTypeConstant.ROTATE, new Resource("classpath", "bgimages/48.jpg", "default"));
        resourceStore.addResource(CaptchaTypeConstant.CONCAT, new Resource("classpath", "bgimages/48.jpg", "default"));
        resourceStore.addResource(CaptchaTypeConstant.WORD_IMAGE_CLICK, new Resource("classpath", "bgimages/c.jpg", "default"));
        return resourceStore;
    }

}
4. 生成/验证行为验证码
- 这里创建一个
TestController进行演示,里面包含了/genCaptcha生成验证码接口和/check校验验证码接口
@RestController
public class TestController {
    @Autowired
    private ImageCaptchaApplication application;

    /**
     * 生成验证码
     * @return 验证码数据
     */
    @PostMapping("/genCaptcha")
    public ApiResponse<ImageCaptchaVO> genCaptcha() {
        // 1.生成验证码(该数据返回给前端用于展示验证码数据)
        // 参数1为具体的验证码类型, 默认支持 SLIDER、ROTATE、WORD_IMAGE_CLICK、CONCAT 等验证码类型,详见: `CaptchaTypeConstant`类
        return  application.generateCaptcha(CaptchaTypeConstant.SLIDER);
    }

    /**
     * 校验验证码
     * @param data 验证码数据
     * @return 校验结果
     */
    @PostMapping("/check")
    @ResponseBody
    public ApiResponse<?> checkCaptcha(@RequestBody Data data) {
        ApiResponse<?> response = application.matching(data.getId(), data.getData());
        if (response.isSuccess()) {
            return ApiResponse.ofSuccess(Collections.singletonMap("id", data.getId()));
        }
        return response;
    }

    @lombok.Data
    public static class Data {
        // 验证码id,前端回传的验证码ID
        private String  id;
        // 验证码数据,前端回传的验证码轨迹数据
        private ImageCaptchaTrack data;
    }
}
传统项目
1. 引入tianai-captcha验证码包
<dependency>
    <groupId>cloud.tianai.captcha</groupId>
    <artifactId>tianai-captcha</artifactId>
    <version>1.5.5</version>
</dependency>
2. 创建验证码ImageCaptchaApplication对象
- 注意:
ImageCaptchaApplication是线程安全的,建议项目中只创建一次,请勿重复创建。
  ImageCaptchaApplication application = TACBuilder.builder()
      // 设置资源存储器,默认是 LocalMemoryResourceStore
      .setResourceStore(new LocalMemoryResourceStore())
      // 加载系统自带的默认资源(系统内置了几个滑块验证码缺口模板图,调用此函数加载)
      .addDefaultTemplate()
      // 设置验证码过期时间, 单位毫秒, default 是默认验证码过期时间,当前设置为10秒,
      // 可以自定义某些验证码类型单独的过期时间, 比如把点选验证码的过期时间设置为60秒
      .expire("default", 10000L)
      .expire(CaptchaTypeConstant.WORD_IMAGE_CLICK, 60000L)
      // 设置拦截器,默认是 EmptyCaptchaInterceptor.INSTANCE
      .setInterceptor(EmptyCaptchaInterceptor.INSTANCE)
      // 添加验证码背景图片
      // arg1 验证码类型(SLIDER、WORD_IMAGE_CLICK、ROTATE、CONCAT),
      // arg2 验证码背景图片资源
      // 背景图宽高为 600x360
      .addResource(CaptchaTypeConstant.SLIDER, new Resource("classpath", "META-INF/cut-image/resource/1.jpg"))
      .addResource(CaptchaTypeConstant.WORD_IMAGE_CLICK, new Resource("classpath", "META-INF/cut-image/resource/1.jpg"))
      .addResource(CaptchaTypeConstant.ROTATE, new Resource("classpath", "META-INF/cut-image/resource/1.jpg"))
      .addResource(CaptchaTypeConstant.CONCAT, new Resource("classpath", "META-INF/cut-image/resource/1.jpg"))
      // 添加验证码模板图片
      //                .addTemplate("SLIDER",template1)
      // 设置缓存器,可提前生成验证码,用于增加并发性,可以不设置,默认是不开启缓存
      .cached(10, 1000, 5000, 10000L,null)
      // 添加字体包,用于给文字点选验证码提供字体
      .addFont(new Resource("file", "C:\\Users\\Thinkpad\\Desktop\\captcha\\手写字体\\ttf\\千图小兔体.ttf"))
      // 设置缓存存储器,如果要支持分布式,需要把这里改成分布式缓存,比如通过redis实现的 CacheStore 缓存
      .setCacheStore(new LocalCacheStore())
      // 图片转换器,默认是将图片转换成base64格式, 背景图为jpg, 模板图为png, 如果想要扩展,可替换成自己实现的
      .setTransform(new Base64ImageTransform())
      .build();
3. 生成/验证行为验证码
// 生成验证码
// arg1 验证码类型(SLIDER、WORD_IMAGE_CLICK、ROTATE、CONCAT)
// response 为生成的验证码数据,可直接返回给前端
ApiResponse<ImageCaptchaVO> response = application.generateCaptcha(CaptchaTypeConstant.SLIDER);


// 校验验证码
// captchaId 和 track 数据应该是前端传来的验证数据
String captchaId = "";
ImageCaptchaTrack track = null;
ApiResponse<?> matching = application.matching(captchaId, track);
编写好的使用demo
https://gitee.com/tianai/tianai-captcha-demo
前端接入
| 条目 | tianai-captcha-web-sdk |
|---|---|
| 兼容性 | Chrome、Firefox、Safari、Opera、主流手机浏览器、iOS 及 Android上的内嵌Webview |
| 框架支持 | H5、Angular、React、Vue2、Vue3 |
1. 获取验证码前端文件
- 两个方式,可以直接下载作者打包好的文件,或者自己获取源代码进行编译。
方式一: 下载前端文件
- 下载地址: https://gitee.com/dromara/tianai-captcha/releases/download/tianai-captcha-1.5.5/tac-web.zip
- 注: 用的哪个版本的后端,就去下载对应版本的web包。
方式二: 下载源代码
- 源码地址: https://gitee.com/dromara/tianai-captcha/tree/master/tianai-captcha-web-sdk
- 下载完成后执行
npm run build
2. 下载load.js文件(可选)
load.js是一个动态加载js/css的文件,使用这个文件可以在调用验证码的时候再去加载验证码相关的js,可以在用户使用验证码的时候再去加载相关文件。- 下载地址:https://minio.tianai.cloud/public/static/tac/js/load.min.js (右键->另存为)
3. 在html中使用验证码
- 这是一个简单的在html使用的demo
<!doctype html>
<html lang="en">
<head>
    <meta charset="UTF-8">
    <meta name="viewport" content="width=device-width,initial-scale=1">
    <title>Document</title>
    <!-- 验证码加载js,用于动态加载验证码相关静态文件 -->
    <script src="http://localhost:8083/tac/load.js"></script>
    <style>
        #login-div {
            width: 500px;
            height: 500px;
            border: 1px solid #ff5d39;
            position: relative;
        }

        h1 {
            text-align: center;
        }

        .input {
            height: 50px;
            width: 100%;
            border: 1px solid #ccc;
            border-radius: 6px;
            margin: 20px auto;
            color: #ccc;
            line-height: 50px;
            text-align: left;
        }

        .input-left {
            border-right: 1px solid #ccc;
            text-align: center;
            width: 100px;
            display: inline-block;
        }

        .login-btn {
            /*margin: 0 auto;*/
            display: inline-block;
            width: 160px;
            height: 50px;
            background-color: #4BC065;
            color: #fff;
            line-height: 50px;
            text-align: center;
            border-radius: 6px;
        }

        #captcha-box {
            position: absolute;
            left: 900px;
            top: 83px;
        }
    </style>

</head>
<body>


<div id="login-div">
    <!-- 装载验证码的DIV -->
    <div id="captcha-box"></div>
    <h1>用户登录</h1>
    <div class="input">
        <span class="input-left">用户名</span>
        xxxxx
    </div>
    <div class="input">
        <span class="input-left">密码</span>
        xxxxx
    </div>
    <div id="login-btn">登录</div>
</div>


<script>
    document.addEventListener("DOMContentLoaded", function () {
        const btn = document.querySelector("#login-btn");
        btn.addEventListener("click", function () {
            const captchaConfig = {
                // 生成接口 (必选项,必须配置, 要符合tianai-captcha默认验证码生成接口规范)
                // 正确返回的数据结构: {code:200, data:{}}
                // 异常返回的数据结构: {code:500, msg:'xxx'}
                requestCaptchaDataUrl: "http://localhost:8083/gen",
                // 验证接口 (必选项,必须配置, 要符合tianai-captcha默认验证码校验接口规范)
                // 正确返回的数据结构: {code:200, data:{}}
                // 异常返回的数据结构: {code:500, msg:'xxx'}
                validCaptchaUrl: "http://localhost:8083/check",
                // 验证码绑定的div块 (必选项,必须配置)
                bindEl: "#captcha-box",
                // 验证成功回调函数(必选项,必须配置)
                validSuccess: (res, c, t) => {
                    console.log("验证码验证成功回调...");
                    // 销毁验证码组件
                    t.destroyWindow();
                    // 调用具体的业务方法
                    login(res.data.token);
                },
                // 验证失败的回调函数(可忽略,如果不自定义 validFail 方法时,会使用默认的)
                validFail: (res, c, t) => {
                    console.log("验证码验证失败回调...");
                    // 验证失败后重新拉取验证码
                    t.reloadCaptcha();
                },
                // 刷新按钮回调事件
                btnRefreshFun: (el, tac) => {
                    console.log("刷新按钮触发事件...");
                    tac.reloadCaptcha();
                },
                // 关闭按钮回调事件
                btnCloseFun: (el, tac) => {
                    console.log("关闭按钮触发事件...");
                    tac.destroyWindow();
                }
            };

            // 一些样式配置, 可不传
            const style = {
                // logoUrl: "..."
            };
            // 参数1: tac文件的URL地址前缀, 目录里包含 tac的js和css等文件,
            //      比如参数为: http://xxxx/tac, 该js会自动加载 http://xxxx/tac/js/tac.min.js 、http://xxxx/tac/css/tac.css等
            // 参数2: tac验证码相关配置
            // 参数3: tac窗口一些样式配置
            window.loadTAC("http://localhost:8083/tac", captchaConfig, style).then(tac => 			  {
                tac.init();
            }).catch(e => {
                console.log("加载失败", e);
            });
        });
        // 自定义业务方法
        function login(captchaToken) {
            fetch("http://localhost:8083/login", {
                method: "POST",
                headers: {
                    "Content-Type": "application/json;charset=UTF-8"
                },
                body: JSON.stringify({
                    token: captchaToken,
                    username: "zhangsan",
                    password: "123456"
                })
            })
                .then(resp => resp.json())
                .then(response => {
                    if (response.code == 200) {
                        alert("登录成功");
                    }
                })
                .catch(err => console.error(err));
        }
    });
</script>

</body>
</html>
如果您没有使用
load.js,直接将上面demo中的window.loadTAC("http://localhost:8083/tac", captchaConfig, style).then(tac =>{ tac.init(); }).catch(e => { console.log("加载失败", e); });替换成
new TAC(config, styleConfig).init();即可。
二次验证(两步验证)
二次验证是什么?
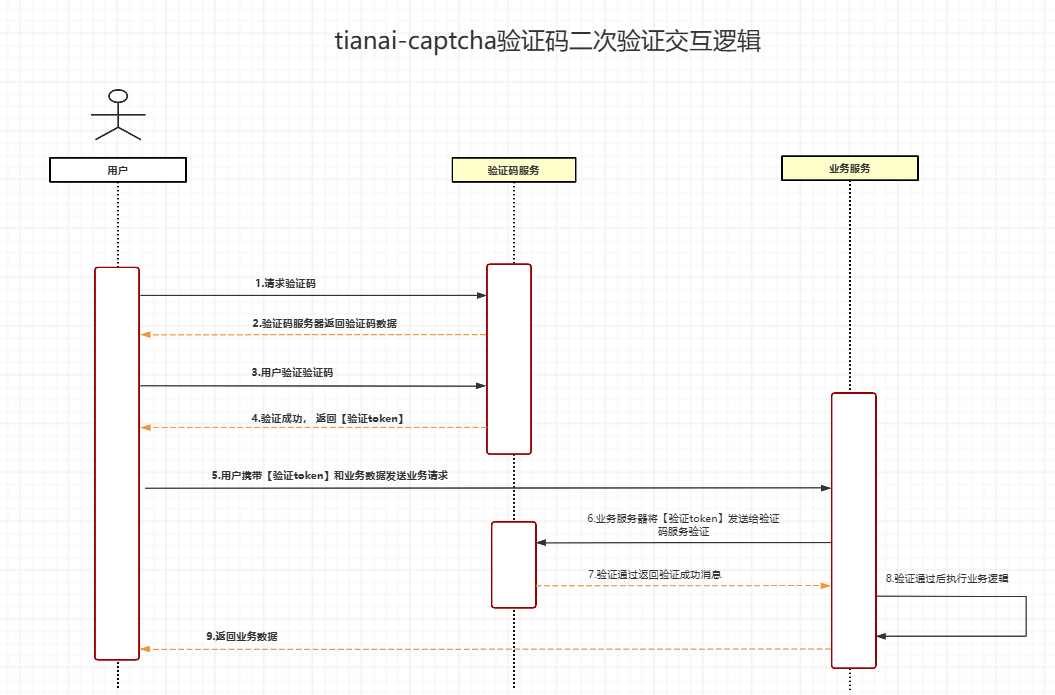
如果您通过上面文档运行起来该验证码项目的话,您应该发现了上面验证码的生成和校验都是单独的,和自身的业务像是没有任何关系的样子。那么如何将验证码绑定到自己的业务接口呢? 那就需要验证验证码成功后返回一个
token,前端调用自身业务接口的时候顺带给后台传上该token,然后后台再校验该token的有效性;这样就可以完成验证码和自身自身业务接口的绑定了;事实上目前大部分行为验证码提供商都是这样子的一种流程。方便用户进一步了解二次验证附上交互流程图。
开启二次验证
目前仅有SpringBoot脚手架里支持该功能;
为什么只有SpringBoot脚手架支持该功能?难道它需要SpringBoot的一些相关特性吗?
其实是因为它的实现太简单了;
官方实现的逻辑其实就是验证码生成成功后,存到缓存里一个有过期时间的key作为token,就这么简单。
作者也推荐各位同学自行实现二次验证的逻辑。springboot的实现作为参考
1. 配置中开启二次验证
captcha:
  secondary:
    # 二次验证, 默认false 不开启
    enabled: true
    # 二次验证key过期时间, 默认 2分钟
    expire: 120000
    # 二次验证缓存key前缀,默认是 captcha:secondary
    keyPrefix: "captcha:secondary"
2. 使用二次验证
  @RestController
public class TestController {
  @Autowired
  private ImageCaptchaApplication sca;

  @RestController
  public class TestController {
    @Autowired
    private ImageCaptchaApplication application;

    @PostMapping("/login")
    public void genCaptcha(@RequestParam String validToken) {
      boolean valid = ((SecondaryVerificationApplication) application).secondaryVerification(id);
      if (valid) {
        // 验证码验证成功,此处进行自定义业务处理
      }
      throw new RuntimeException("验证码验证失败");
    }
  }

}
JAVA后端其他配置
自定义背景图片/模板资源相关配置
- 一个验证码一般需要有
背景图片和验证码模板两种资源才能生成。- 背景图片:验证码中的背景图(注: 如果使用系统自带模板, 背景图尺寸应为600x360)
- 模板图片: 滑块验证码中的滑块样式、旋转验证码中的原型轮廓
- 注:文字点选、滑动还原验证码不需要模板图片
SpringBoot项目
@Configuration
public class CaptchaResourceConfiguration {

  /**
   * 配置验证码资源存储器
   * @return ResourceStore
   */
  @Bean
  public ResourceStore resourceStore() {
    // 使用简单的本地内存存储器,实际项目中可以使用数据库等存储
    LocalMemoryResourceStore resourceStore = new LocalMemoryResourceStore();

    // 配置自定义模板

    // 给滑块验证码配置模板
    ResourceMap template1 = new ResourceMap(DEFAULT_TAG, 2);
    // 滑块轮廓图片
    template1.put(TEMPLATE_ACTIVE_IMAGE_NAME, new Resource("classpath", "META-INF/cut-image/template/slider_1/active.png"));
    // 滑块凹槽图片
    template1.put(TEMPLATE_FIXED_IMAGE_NAME, new Resource("classpath", "META-INF/cut-image/template/slider_1/fixed.png"));
    resourceStore.addTemplate(CaptchaTypeConstant.SLIDER, template1);

    // 给旋转验证码配置模板
    ResourceMap template2 = new ResourceMap(DEFAULT_TAG, 2);
    // 旋转验证码轮廓图片
    template2.put(TEMPLATE_ACTIVE_IMAGE_NAME, new Resource("classpath", "META-INF/cut-image/template/rotate_1/active.png"));
    // 旋转验证码凹槽图片
    template2.put(TEMPLATE_FIXED_IMAGE_NAME, new Resource("classpath", "META-INF/cut-image/template/rotate_1/fixed.png"));
    resourceStore.addTemplate(CaptchaTypeConstant.ROTATE, template2);

    // 配置背景图
    // ...
    return resourceStore;
  }

}
传统项目
// 给滑块验证码配置模板
ResourceMap template1 = new ResourceMap(DEFAULT_TAG, 2);
// 滑块轮廓图片
template1.put(TEMPLATE_ACTIVE_IMAGE_NAME, new Resource("classpath", "META-INF/cut-image/template/slider_1/active.png"));
// 滑块凹槽图片
        template1.put(TEMPLATE_FIXED_IMAGE_NAME, new Resource("classpath", "META-INF/cut-image/template/slider_1/fixed.png"));

// 给旋转验证码配置模板
ResourceMap template2 = new ResourceMap(DEFAULT_TAG, 2);
// 旋转验证码轮廓图片
template2.put(TEMPLATE_ACTIVE_IMAGE_NAME, new Resource("classpath", "META-INF/cut-image/template/rotate_1/active.png"));
// 旋转验证码凹槽图片
        template2.put(TEMPLATE_FIXED_IMAGE_NAME, new Resource("classpath", "META-INF/cut-image/template/rotate_1/fixed.png"));

ImageCaptchaApplication application = TACBuilder.builder()
        // 设置资源存储器,默认是 LocalMemoryResourceStore
        .setResourceStore(new LocalMemoryResourceStore())
        // 配置模板
        .addTemplate(CaptchaTypeConstant.SLIDER,template1)
        .addTemplate(CaptchaTypeConstant.ROTATE,template2)
    ...其他配置
            .build();
自定义缓存器配置
缓存器的作用是负责将生成验证码的相关数据存储到缓存中,在校验验证码的时候使用
如果您需要将数据存到自定义数据库中,如
Redis等数据库中,则需要自定义缓存器
SpringBoot项目
- 注: 在SpringBoot脚手架中,如果您项目中使用的springboot官方的
redis包, 脚手架会自动将缓存切换到redis中。 - 如果您想自定义缓存器,参考下面代码
@Configuration
public class CaptchaResourceConfiguration {
  /**
   * 自定义缓存器
   * @return CacheStore
   */
  @Bean
  public CacheStore cacheStore() {
    // 可参考
    // LocalMemoryResourceStore  本地缓存
    // RedisResourceStore  redis缓存
    return new CacheStore() {
           ...实现相关接口
    };
  }
}
传统项目
ImageCaptchaApplication application = TACBuilder.builder()
// 设置缓存存储器,如果要支持分布式,需要把这里改成分布式缓存,比如通过redis实现的 CacheStore 缓存
        .setCacheStore(new LocalCacheStore())
...其他配置
        .build();
生成验证码时可调整的参数
自定义容错值
- 容错值的作用是什么?
- 容错值的作用是用来平衡用户滑动/点击 到正确答案可允许的误差,
- 拿滑块验证码举例, 如果你的容错值是0, 则用户必须必须精准滑动到缺口为止,不允许有1个像素的偏差(通常对人类来说很难), 如果你的容错值是0.5,则用户可不必精准滑动到缺口处就可完成验证
- 用户自定义容错只需要在生成验证码的时候传入自定义的容错值即可,通常内部已经针对不同类型的验证码设置了适当的容错值。
GenerateParam generateParam = new GenerateParam();
// 要生成的验证码类型
generateParam.setType(type);
// 自定义容错值
generateParam.addParam(ParamKeyEnum.TOLERANT, 0.02);
ApiResponse<ImageCaptchaVO> response = imageCaptchaApplication.generateCaptcha(generateParam);
点选验证码自定义干扰文字数量和校验的文字数量
GenerateParam generateParam = new GenerateParam();
// 要生成的验证码类型
generateParam.setType(type);
// 用户只需要点击两个正确的文字即可完成校验
generateParam.addParam(ParamKeyEnum.CLICK_CHECK_CLICK_COUNT, 2);
// 会有三个随机文字作为干扰项
generateParam.addParam(ParamKeyEnum.CLICK_INTERFERENCE_COUNT, 3);
ApiResponse<ImageCaptchaVO> response = imageCaptchaApplication.generateCaptcha(generateParam);
文字点选验证码指定字体包
在配置字体包的时候传入指定的tag
springboot配置指定
captcha:
  font-path:
    - classpath:xxx/123.ttf?tag=font1
编码指定
ImageCaptchaApplication application = TACBuilder.builder()
// 添加字体包,用于给文字点选验证码提供字体
.addFont(new Resource("file", "/xxx/xxx.ttf", "font1"))
.build();
或者
@Bean
public ResourceStore resourceStore() {
    // 使用简单的本地内存存储器,实际项目中可以使用数据库等存储
    LocalMemoryResourceStore resourceStore = new LocalMemoryResourceStore();
    // 配置字体包
    resourceStore.addResource(FontCache.FONT_TYPE, new Resource("classpath", "xxx/xxx.ttf", "font1"));
    return resourceStore;
}
生成文字点选验证码的时候指定tag
GenerateParam generateParam = new GenerateParam();
// 要生成的验证码类型
generateParam.setType(type);
// 指定tag为font1的字体包进行生成
generateParam.addParam(ParamKeyEnum.FONT_TAG, "font1");
ApiResponse<ImageCaptchaVO> response = imageCaptchaApplication.generateCaptcha(generateParam);
前端其他web框架接入
- 作者编写的webSDK为纯原生js,不使用任何其它第三方框架, 该方式的好处是,只要最终在在浏览器中就可以使用上述方法接入,不区分是用户用的是哪种前端框架。
- 作者写了一个vue框架引入的demo, 可以在右边便签中下载, 其它框架引入方式同理。
- 安卓/IOS等客户端接入方式使用webview组件。
- 小程序、uniapp可以使用webview组件,如果需要纯原生的代码,可以加作者联系。
如有其它不清楚的问题或者有什么建议请加群联系
qq群: 305532064
微信群:
